> ## Documentation Index
> Fetch the complete documentation index at: https://support.yena.ai/llms.txt
> Use this file to discover all available pages before exploring further.
# Run a campaign from setup to replies
> Build, check, launch, and monitor an email or LinkedIn campaign in Yena.
This guide covers the complete workflow — from creating a campaign to handling the first replies.
Sending stays off while you prepare. Nothing goes out until you switch **Activate sending** on, and Yena will not let you switch it on until the campaign passes its readiness checks.
## Before you start
* [Connect the email account](/en/integrations/connect-email) or [LinkedIn account](/en/integrations/connect-linkedin) you want to send from.
* Make sure the people you plan to add have the contact detail each channel needs: an email address for email steps, a LinkedIn profile for LinkedIn steps.
* Decide whether the campaign is for candidate sourcing or business development.
## 1. Create the campaign
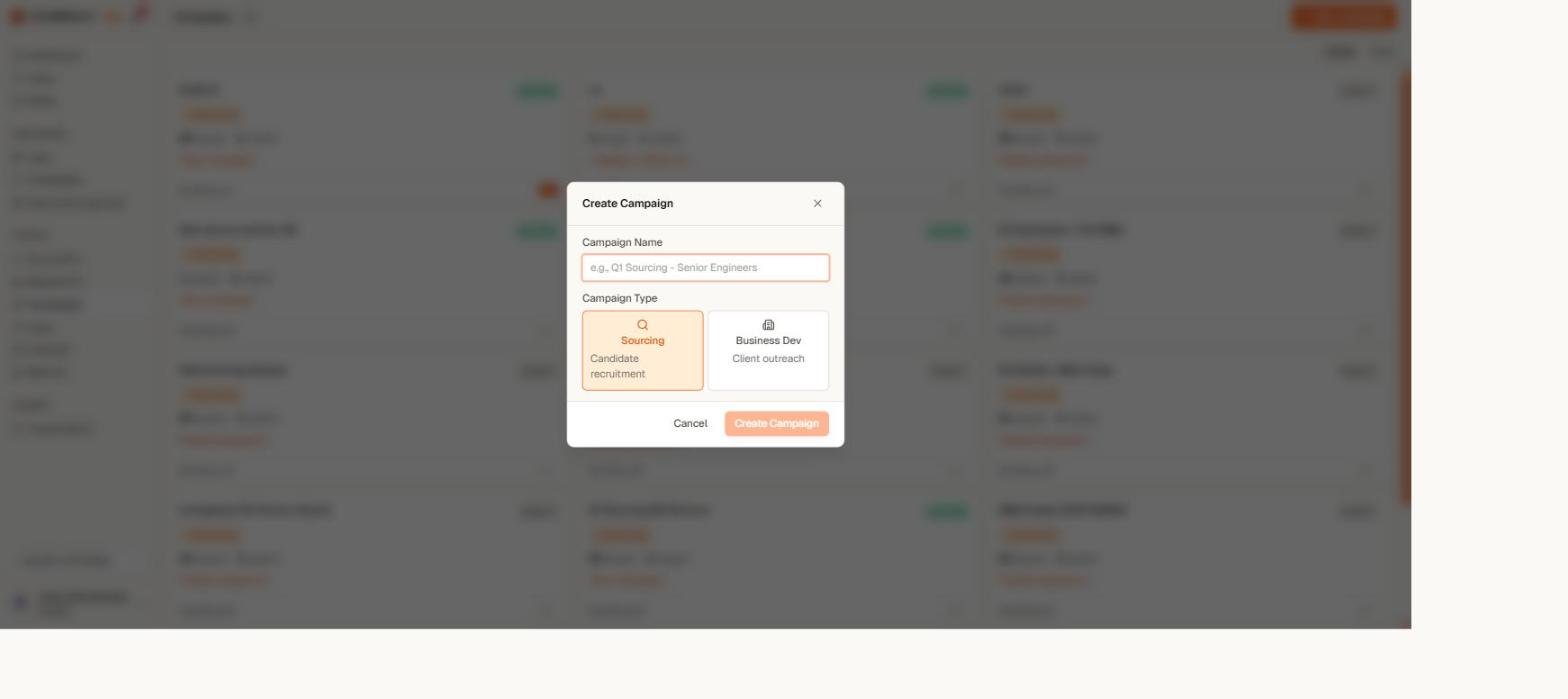 1. Open **Campaigns** from the main navigation.
2. Select **New campaign**.
3. Give it a clear name and choose **Sourcing** or **Business Dev**.
You can link a job, client, or description later in the campaign's **Settings** tab.
## 2. Add people
1. Open **Campaigns** from the main navigation.
2. Select **New campaign**.
3. Give it a clear name and choose **Sourcing** or **Business Dev**.
You can link a job, client, or description later in the campaign's **Settings** tab.
## 2. Add people
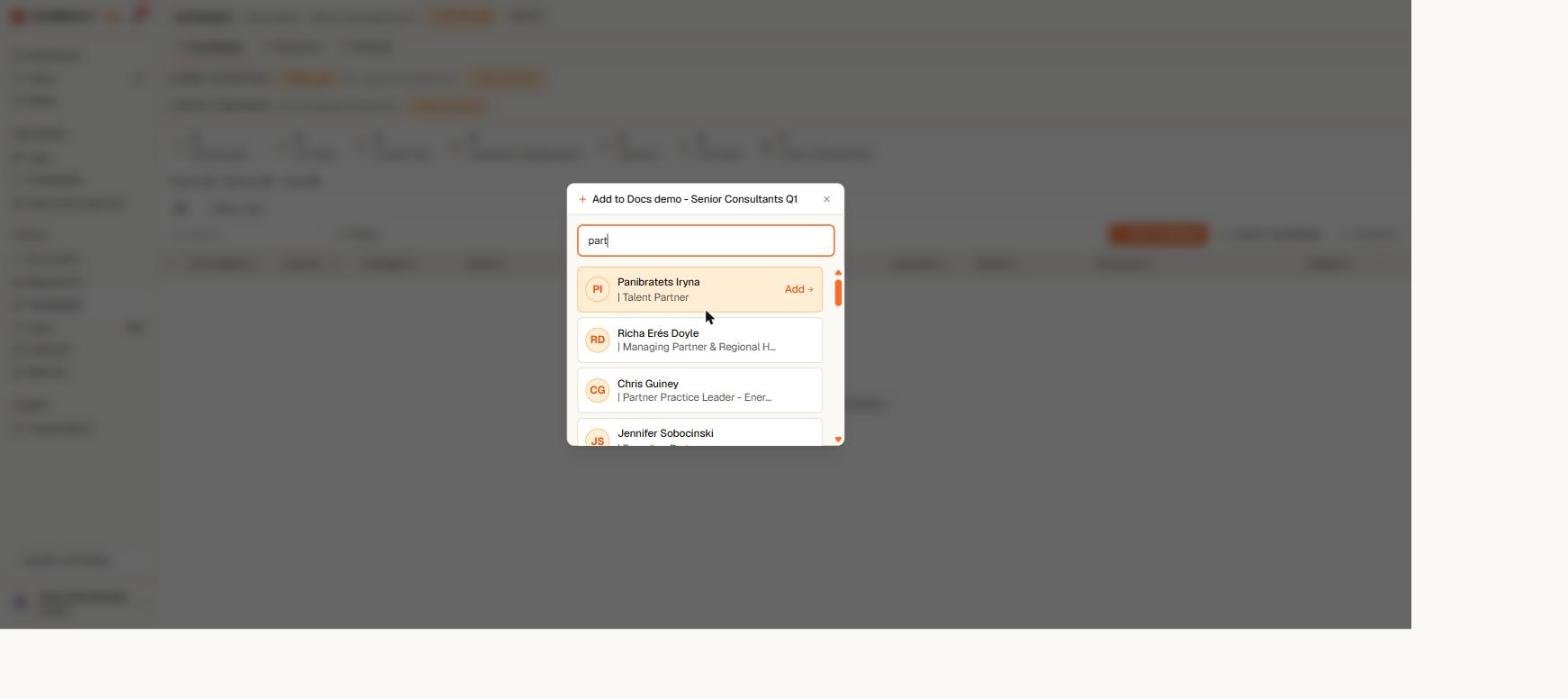 Open the **Candidates** tab and add people directly, or send them in from anywhere else in Yena — a Sourcer shortlist, the Candidates list, Contacts, or a job — using **Add to campaign**. You can even create the campaign from inside that picker.
People added after launch are picked up automatically — Yena reconciles the list every time it checks what to send.
## 3. Build the sequence
Open the **Sequence** tab and add your steps in order. Each follow-up waits a number of days and hours after the previous step. See [Build your sequence](/en/campaigns/build-your-sequence) for step types, timing, and personalization.
Keep your first sequence short. One connection request and one relevant follow-up are easier to validate — and usually perform better — than a long chain.
## 4. Set the sender and delivery window
Open the **Candidates** tab and add people directly, or send them in from anywhere else in Yena — a Sourcer shortlist, the Candidates list, Contacts, or a job — using **Add to campaign**. You can even create the campaign from inside that picker.
People added after launch are picked up automatically — Yena reconciles the list every time it checks what to send.
## 3. Build the sequence
Open the **Sequence** tab and add your steps in order. Each follow-up waits a number of days and hours after the previous step. See [Build your sequence](/en/campaigns/build-your-sequence) for step types, timing, and personalization.
Keep your first sequence short. One connection request and one relevant follow-up are easier to validate — and usually perform better — than a long chain.
## 4. Set the sender and delivery window
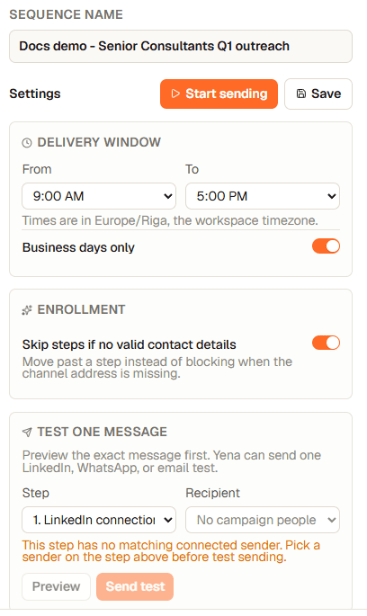 Each sending step uses one of your connected accounts — set it on the step itself. Then, in the sequence settings:
1. Choose the **From** and **To** hours. Yena shows your workspace timezone next to the window.
2. Keep **Business days only** on unless the campaign genuinely needs weekend delivery.
3. Decide whether steps with missing contact details should be skipped for that person, or should hold their journey.
4. Select **Save**.
A step's delay makes it *eligible* to send; the delivery window and daily limits decide *when* it actually goes out.
## 5. Check readiness and preview
Each sending step uses one of your connected accounts — set it on the step itself. Then, in the sequence settings:
1. Choose the **From** and **To** hours. Yena shows your workspace timezone next to the window.
2. Keep **Business days only** on unless the campaign genuinely needs weekend delivery.
3. Decide whether steps with missing contact details should be skipped for that person, or should hold their journey.
4. Select **Save**.
A step's delay makes it *eligible* to send; the delivery window and daily limits decide *when* it actually goes out.
## 5. Check readiness and preview
 The readiness strip above the sequence tells you whether the campaign can start — and if not, exactly what is missing: no people yet, an empty email subject, a step without a sender, more than one connection request. Each blocker links to the place to fix it.
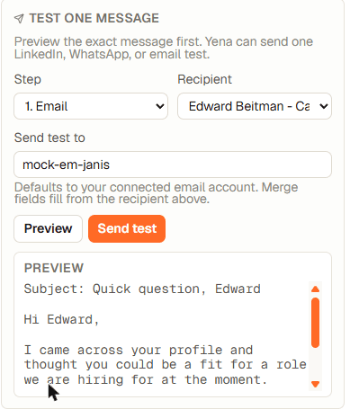 Use **Test one message** to pick a step and a recipient and see the exact wording that would go out, with every personalization field filled in. Check it before you launch.
## 6. Turn sending on
On the Campaigns page, switch **Activate sending** on. Yena confirms how many people will be enrolled, then starts working through the sequence inside your delivery window.
The switch is also the stop button: turn it off at any time and no further steps are sent. Already-sent messages and invitations cannot be recalled.
While sending is on, the sequence is read-only. Pause the campaign first if you need to change a step — this protects people mid-journey from being moved onto a half-edited sequence.
## 7. Watch it run
The **Candidates** tab shows a live, per-person status — what happened last and what happens next, with the exact time. The analytics bar above it counts only real, confirmed sends: invitations sent and accepted, messages, emails, and replies. See [Track progress and replies](/en/campaigns/track-progress-and-replies).
## 8. Handle replies
When someone replies — on LinkedIn or by email — Yena immediately takes them out of every campaign, cancels their remaining steps, marks them **Replied**, and notifies you. The conversation is waiting in **Inbox**; from there on it's you, not the sequence.
## Troubleshooting
* **A person is "waiting":** check their status line in the Candidates tab — it names the reason: not due yet, outside the delivery window, today's limit reached, or waiting for an invitation to be accepted.
* **A LinkedIn follow-up has not sent:** it waits for the connection to be accepted. Yena checks acceptance automatically; the follow-up delay starts from the moment they accept.
* **The activation switch is disabled:** the readiness strip lists what is missing. Fix the named items and it enables itself.
* **A message looks wrong:** turn sending off, correct the sequence, preview again, then resume.
Use **Test one message** to pick a step and a recipient and see the exact wording that would go out, with every personalization field filled in. Check it before you launch.
## 6. Turn sending on
On the Campaigns page, switch **Activate sending** on. Yena confirms how many people will be enrolled, then starts working through the sequence inside your delivery window.
The switch is also the stop button: turn it off at any time and no further steps are sent. Already-sent messages and invitations cannot be recalled.
While sending is on, the sequence is read-only. Pause the campaign first if you need to change a step — this protects people mid-journey from being moved onto a half-edited sequence.
## 7. Watch it run
The **Candidates** tab shows a live, per-person status — what happened last and what happens next, with the exact time. The analytics bar above it counts only real, confirmed sends: invitations sent and accepted, messages, emails, and replies. See [Track progress and replies](/en/campaigns/track-progress-and-replies).
## 8. Handle replies
When someone replies — on LinkedIn or by email — Yena immediately takes them out of every campaign, cancels their remaining steps, marks them **Replied**, and notifies you. The conversation is waiting in **Inbox**; from there on it's you, not the sequence.
## Troubleshooting
* **A person is "waiting":** check their status line in the Candidates tab — it names the reason: not due yet, outside the delivery window, today's limit reached, or waiting for an invitation to be accepted.
* **A LinkedIn follow-up has not sent:** it waits for the connection to be accepted. Yena checks acceptance automatically; the follow-up delay starts from the moment they accept.
* **The activation switch is disabled:** the readiness strip lists what is missing. Fix the named items and it enables itself.
* **A message looks wrong:** turn sending off, correct the sequence, preview again, then resume.